There’s something special about making your bike truly your own. For many riders, it’s not just about performance, it’s also about personality and pride. Whether you’re a weekend trail explorer or a regular at the local motocross track, standing out from the crowd is a big part of riding culture. Custom graphics are more than decoration; they’re a way to express who you are every time you hit the throttle.
The Essentials: Understanding Husqvarna Graphics Kits
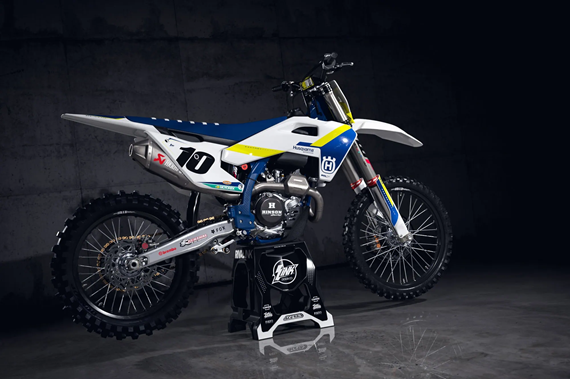
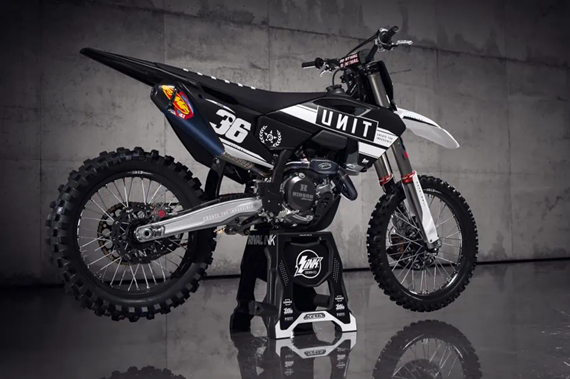
One of the most popular choices for riders looking to upgrade their bike’s appearance is a standout Husqvarna graphics kit. These kits are designed to fit a wide range of bike models, covering everything from shrouds and fenders to number plates and swingarms. A graphics kit typically includes a full set of high-quality vinyl decals, precision-cut to match each plastic part.
The main purpose is twofold: to protect your plastics from scratches and wear and to give your bike a fresh, professional look. With so many options for colours, patterns and finishes, it’s easy to see why these kits are a must-have for riders who want their bike to look as good as it rides.
Stand Out: The Benefits of Personalised Graphics
Custom graphics offer practical protection against the scuffs and scrapes that come with off-road riding. High-quality kits use thick, durable vinyl that can handle mud, rocks and the occasional tip-over. Installation is straightforward, with strong adhesives that stick firmly but won’t damage your plastics if you want to switch things up. For many, the biggest benefit is individuality; no two bikes on the starting line need to look the same. Whether you prefer bold, eye-catching designs or something more subtle, Husqvarna graphics let you put your stamp on your machine.
Up Close: What Makes These Kits Special
The best kits are made from premium materials, often using thick, motocross-grade vinyl that’s built to last. They’re precision-cut for an exact fit, so you won’t be left trimming edges or dealing with awkward bubbles. Many suppliers offer online design tools, letting you preview your kit before you buy.
Choose your colours, add your name or number, and see how it’ll look on your actual bike model. That’s exactly why getting your Husqvarna graphics kit can make all the difference when it comes to expressing your personality on the track. The adhesive backing is another standout feature. It’s designed to stick tight even in tough conditions, without leaving a sticky mess if you ever decide to remove or replace your kit.
Some kits also offer extra options, like chrome or holographic finishes, which can really set your bike apart. And if you ride hard, you’ll appreciate how these graphics protect the underlying plastics from UV damage, mud stains and general wear and tear. For those who want a truly unique look, there’s the option to customise every detail. You can match your kit to your riding gear, team colours or even your helmet. The result is a bike that looks sharp, feels personal and is ready for anything.
Your Design, Your Way: Creating the Perfect Look
Designing your own graphics kit is a breeze thanks to modern online configurators. You start by selecting your bike model and year, ensuring a perfect fit. From there, you can play with colour schemes, add logos or names and preview the finished product in real time. Not sure where to start? Try picking out a main colour that matches your gear or helmet, then add accent colours for flair. Many riders like to include their racing number or a nickname for that extra personal touch.
DIY Success: Applying Your Graphics Kit
Applying a graphics kit might seem daunting at first, but it’s a job most riders can tackle at home with a bit of patience. Start by giving your plastics a thorough clean; any dirt or oil will stop the decals from sticking properly. Make sure you’re working in a warm, dust-free environment and have a squeegee or credit card on hand to smooth out bubbles as you go. Take your time lining up each piece before pressing it down and don’t be afraid to peel back and adjust if you need to.
Some riders find it helpful to use a hairdryer or heat gun on a low setting to help the vinyl conform to tricky curves. If you ever want to remove your kit, a bit of heat will also make the process easier and prevent any residue. And if you’re not confident, there are plenty of video tutorials online to walk you through the process step by step.
Exploring Other Ways to Customise
There are also plenty of other ways to give your bike a fresh look. Some riders opt for partial kits that just cover the most visible areas, like the shrouds and number plates. Others prefer accent decals or small logos to add a bit of personality without going all out.
There are even options for those who like to change things up regularly; removable wraps or magnetic decals can be swapped out as often as you like. And if you’re not keen on doing it yourself, some shops offer professional installation for a flawless finish.
Pro Tips: Making Your Graphics Last
To keep your graphics looking sharp, a little care goes a long way. Always wash your bike with mild soap and water, since harsh chemicals can fade the colours and weaken the adhesive. Avoid using high-pressure washers directly on the edges of your decals, as this can cause them to lift over time. If you notice any peeling, a bit of heat from a hairdryer can help you press the vinyl back into place.
It’s also a good idea to keep any spare decals that come with your kit, just in case you need to replace a section down the track. And if you ever want to remove your graphics, take your time and use gentle heat to avoid damaging the plastics underneath. With proper care, your kit will stay looking fresh for seasons to come.
Ride with Pride: Express Yourself with Custom Graphics
Customising your bike is, down the line, all about making your ride a true reflection of who you are. Whether you go for a full kit or just a few accents, the right graphics can boost your confidence and make every ride feel special. With so many options for design, materials and finishes, there’s never been a better time to get creative. So go ahead, give your bike the look it deserves and enjoy the ride knowing it’s truly yours.